
The start app of XinematiX contains only
two sounds. The complete app contains almost 1,000 sounds, spread over 63 sample libraries and requires free
memory of approximately 25 GB.
Therefore, before you buy the complete XinematiX library, please check whether your device has enough free memory.
If not, there are two possibilities:
1. You only download a part of the sample libraries. See:
Partial download of the sample libraries
2. You connect an external SSD to your device. See:
External Storage
If yes, proceed as follows:
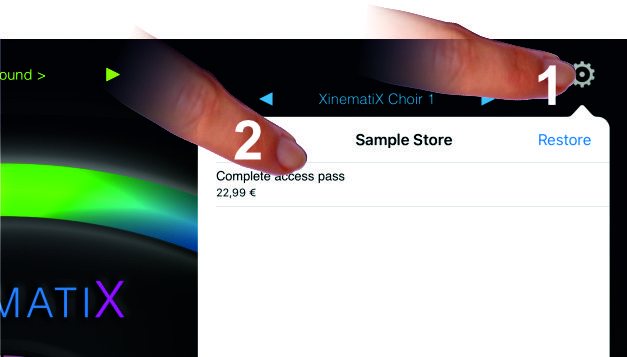
1. Tap on the tool symbol at the top right.
2. Tap on "Complete access pass"
The App Store will now open. Follow its instructions to buy the complete number of sample libraries
 After you have purchased the complete XinematiX sample libraries, tap on "settings".
Afterward tap on "download sample libraries".
 A list of the XinematiX sample libraries opens.
These are sorted in alphabetical order. If necessary, scroll up and down this list.
A list of the XinematiX sample libraries opens.
These are sorted in alphabetical order. If necessary, scroll up and down this list.
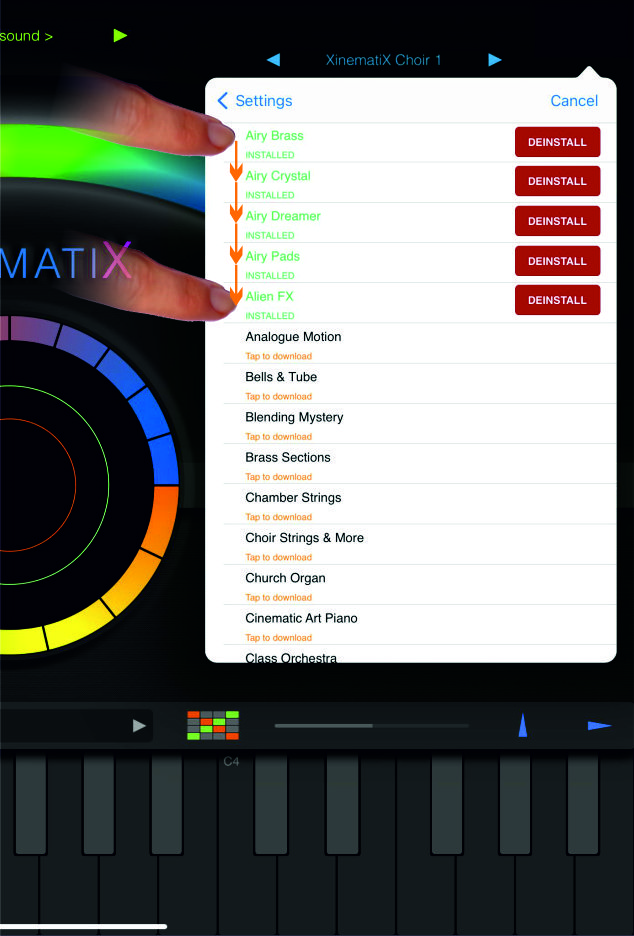 Now tap at "Tap to download"at each sample library. A downloaded sample library is displayed in green.
In addition, an “Deinstall” button appears.
Now tap at "Tap to download"at each sample library. A downloaded sample library is displayed in green.
In addition, an “Deinstall” button appears.
By tapping on "Deinstall" you can delete individual sample libraries if you want to increase your memory capacity.
Deinstalled sample libraries are shown like in the beginning in black lettering with the suffix "Tap to download".
In this way you can download them again.
XinematiX is designed for actual iPads and iPhones.
Maybe you know already how to connect your MIDI device e.g. your keyboard with your iPad or iPhone for sending MIDI data to
the XinematiX App and how to output the audio signals to your headphones or to your speakers.
If not, you will find in the following some useful tips.
Older iPad models and iPhones had two separate sockets, one of them for receiving MIDI data, the other for the output of audio signals.
The latter was a 3.5 mm socket for accommodating an appropriate plug. The socket for receiving MIDI data
had different forms and sizes. In this way one has or had to connect two different cables with matching plugs between keyboard and
iPad/ iPhone respectively between iPad/ iPhone and headphone or speakers.
At the actual iPad and iPhones Apple has deleted a separate audio output socket. There exists only one single USB C socket, being
responsible for receiving either MIDI data or(!) sending audio signals. It seems that nobody of the responsible Apple developers considered
that it should be possible to support both a the same time: data input and audio output.
Fortunately, there exist tools to overcome this problem. See the following three typical examples.
 The first one is an easy-to-use USB-C hub from Satechi. See the figure on the left, which is self-explanatory.
The advantage of this hub is that it can be connected directly to the iPad or iPhone without a cable.
The first one is an easy-to-use USB-C hub from Satechi. See the figure on the left, which is self-explanatory.
The advantage of this hub is that it can be connected directly to the iPad or iPhone without a cable.
If a cable connection doesn't bother you, you can find a number of alternative USB C hubs with 3,5 mm sockets.
 Alternately it is possible to send MIDI Data from your iPad or iPhone via Bluetooth. This Yamaha Bluetooth Hub
requires an additional power adapter.
The picture at the left shows how to connect the different elements.
The disadvantage of this tool is that you have to renew the Bluetooth connection every time you restart it.
Alternately it is possible to send MIDI Data from your iPad or iPhone via Bluetooth. This Yamaha Bluetooth Hub
requires an additional power adapter.
The picture at the left shows how to connect the different elements.
The disadvantage of this tool is that you have to renew the Bluetooth connection every time you restart it.
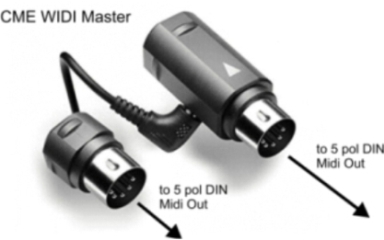 Another Bluetooth adapter is the CME WIDI Master. It is designed for the connection with a 5pol DIN socket. This tool requires no
additional power adapter.
Another Bluetooth adapter is the CME WIDI Master. It is designed for the connection with a 5pol DIN socket. This tool requires no
additional power adapter.
The main element sends MIDI Data via Bluetooth. The side element is not necessary for a Bluetooth transmission, it is designed for
an alternate direct connection with another 5pol DIN socket.
For a Bluetooth connection, please set Bluetooth to 'On' in the iPad or iPhone settings as well as in the XinematiX settings.
In default XinematiX supports all ('Omni') MIDI Channels. It is possible to change this setting for controlling XinematiX
by only one MIDI channel. This may be necessary if you want to control different apps from the same MIDI device. e.g. from your keyboard.
But please note: It is not possible to control XinematiX by two or more different MIDI channels at the same time.
Change this setting if necessary as described in:
MIDI settings and other tools
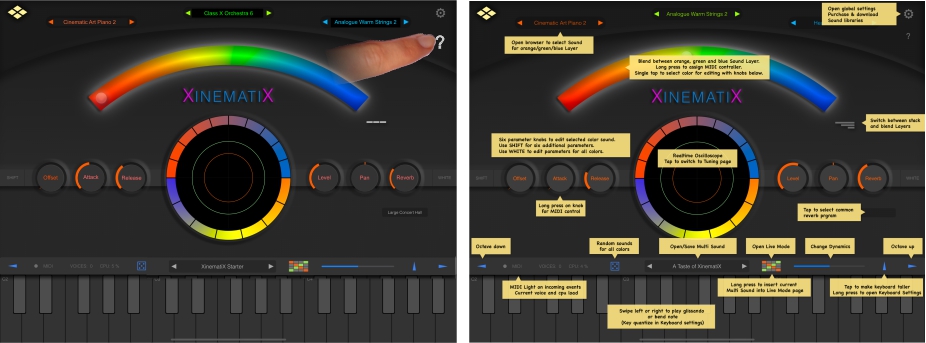
By tapping on the question mark symbol in the top right corner, a brief overview of the
XinematiX functions is displayed by notes in yellow fields.
Delete these notes by tapping on the question mark symbol again.
In the following sections, the various functions are described in more detail.
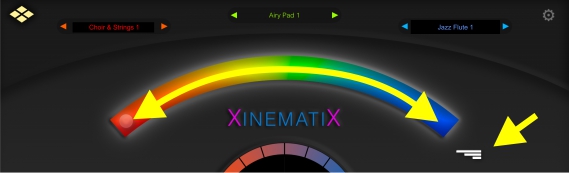 On the top of the screen you will find three sounds displayed: A red, a green and a blue one.
These three sounds form a combination which we call a "Multi". By default, the green field contains the
entry "no sound". Nevertheless, it is a Multi that can be expanded to three sounds.
The circular slider on the curved element below controls the different combinations of the three sounds
On the top of the screen you will find three sounds displayed: A red, a green and a blue one.
These three sounds form a combination which we call a "Multi". By default, the green field contains the
entry "no sound". Nevertheless, it is a Multi that can be expanded to three sounds.
The circular slider on the curved element below controls the different combinations of the three sounds
You can move the circular slider with your fingers on the screen. However, it is easier to do this with
the modwheel of your keyboard as in default the modwheel is designed for controlling this circular slider.
If you would like to control this slider by a different tool then please read how to handle this at
Assign alternative MIDI controllers.
For selecting or combining the red, the green and the blue sound there exists an additional element, namely the white lines
right of the curved element.
These white lines call up two alternative modes for selecting or mixing the currently called sounds.
Switch between these two alternatives as follows:
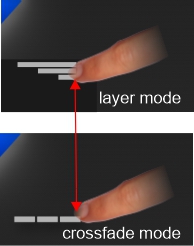 When you tap on the symbol with three lines, the display changes to a single line.
When you tap on the single line, the display changes to three lines.
Three lines control the so-called "layer mode",
One single line controls the so-called "crossfade mode".
See here how layer mode and crossfade mode different control the actual sounds:
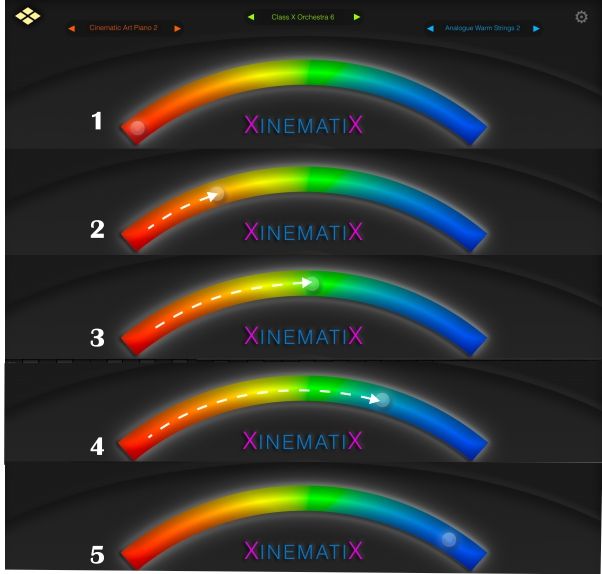
In the layer mode the circular slider on position 1 will play only the red sound.
The slider positions 2 and 3 add slidingly the green sound, followed by positions 4 and 5 with
the blue sound, so that in the end all three sounds will sound together.
The crossfade mode controls a little differently.
Position 1 again plays only the red sound, position 2 plays a mix of the red and the green sound, position 3
presents only the green sound.
Position 4 plays a mix of the green and the blue sound and position 5 presents only the blue sound.

Performing a mix with only the left positioned red sound in combination with the right positioned
blue sound takes a little preparation.
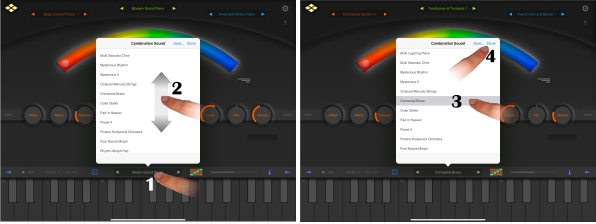
Tap on the green sound (1) so that the directory of sample libraries opens. In this directory tap
on 'no sound' (2) and confirm with 'Done' (3). Now the green sound shows the entry "no sound" (4).
From now on the playback will only transition from the red sound to the blue sound and vice versa.
In addition to what is shown here, the use of an MPE (MIDI Polyphonic Expression) compatible keyboard like the Osmose Synthesizer offers the possibility to mix the three called sounds differently for each note. See Osmose Settings
This is described below. See: Calling up existing Multis.
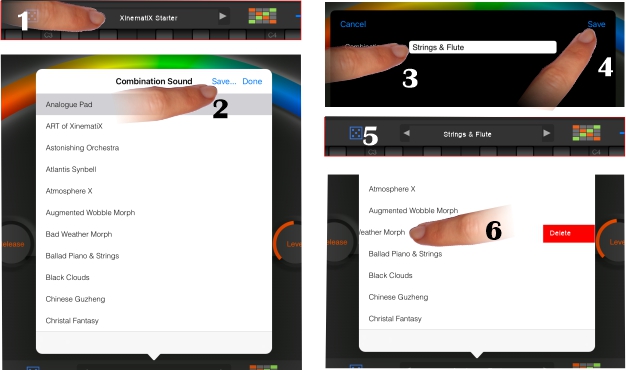
 A XinematiX 'Multi' is a combination of sounds, saved by a typical name. The name of the actual opened Multi
is shown in the center below the colored circle.
A XinematiX 'Multi' is a combination of sounds, saved by a typical name. The name of the actual opened Multi
is shown in the center below the colored circle.
Create a new Multi as follows:
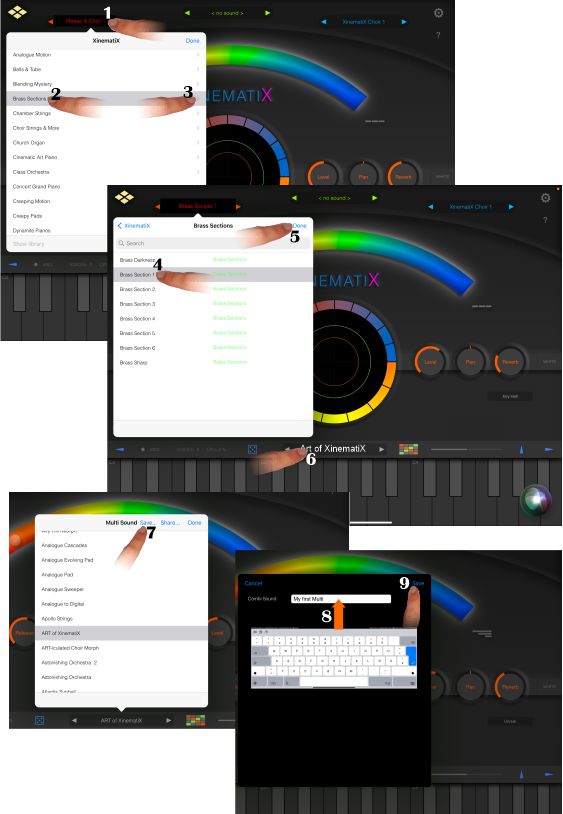
Tap firstly on the left actual instrument name in red(1). A pop up window opens, showing the directory
of all sample libraries. Tap on the desired sample library (2).
Now tap on the small arrow on the right (3). This opens a new window in which the sounds of this library are listed.
Now tap on the name of the desired instrument (4) and then on 'Done' (5).
The pop up window closes.
Edit the green and the blue instrument in the same way.
Now tap on the previous Multi name in the centre at the bottom (6). It may be that there is no name listed
at the moment. However, that does not matter. A new pop up window opens, showing the names of the actual
saved Multis. Tap on 'Save...' (7).
A new pop up window opens. Type into the white field the new
Multi name (8). Tap 'Done' to finish (9).
Replacing sounds in an existing Multi is done in the same way as described above. You only have to maintain the previous Multi name when saving it.
For quick tests or while working actually with no real MIDI keyboard or other MIDI devices
you can use the XinematiX on-screen virtual keyboard. It provides in principle
the full range of 88 keys of a regular piano. For better handling, however,
it shows in default only a section of 3 octaves.
How to edit the widening to 4 or more octaves
is described at Special keyboard settings.
How to enlarge it or to move the octave positions to the left or right
is described below.
Simply tap on the virtual keys to trigger notes on the currently selected sounds.
The keys will lit up and they also will lit up when the concerned notes are triggered on your
MIDI device. So you may also use the on-screen keyboard as
visual indication to control whether your external MIDI device is configured correctly.
The following two images show the virtual keyboard of an iPad. In the default setting, the row of
keys is visible as a narrow band.
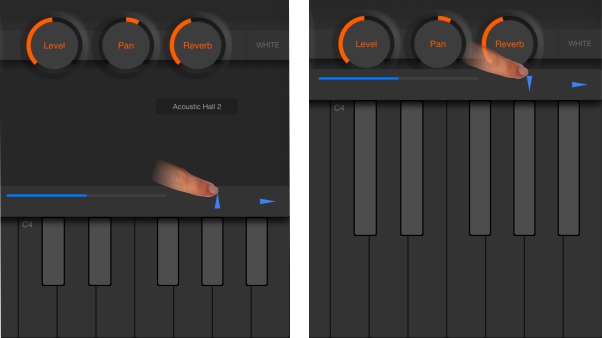 If you want to enlarge the keys for easier operation, tap the blue arrow pointing upwards.
Tapping on the blue arrow pointing downwards will reduce the keys to their default size.
If you want to enlarge the keys for easier operation, tap the blue arrow pointing upwards.
Tapping on the blue arrow pointing downwards will reduce the keys to their default size.
 In contrast to the iPads, in iPhones the virtual keyboard is not visible in the default setting.
Make it visible by tapping the blue upward pointing arrow and make it disappear by tapping
the downward pointing arrow.
In contrast to the iPads, in iPhones the virtual keyboard is not visible in the default setting.
Make it visible by tapping the blue upward pointing arrow and make it disappear by tapping
the downward pointing arrow.
 For both, iPads and iPhones, the on-screen keyboard presents in default the octaves 3, 4 and 5. If
you want to play in a lower area, change the octave position by tapping the blue arrow on the left.
Conversely, a tap on the blue arrow on the right leads to higher octaves.
Each tap leads to one octave lower or higher.
For both, iPads and iPhones, the on-screen keyboard presents in default the octaves 3, 4 and 5. If
you want to play in a lower area, change the octave position by tapping the blue arrow on the left.
Conversely, a tap on the blue arrow on the right leads to higher octaves.
Each tap leads to one octave lower or higher.
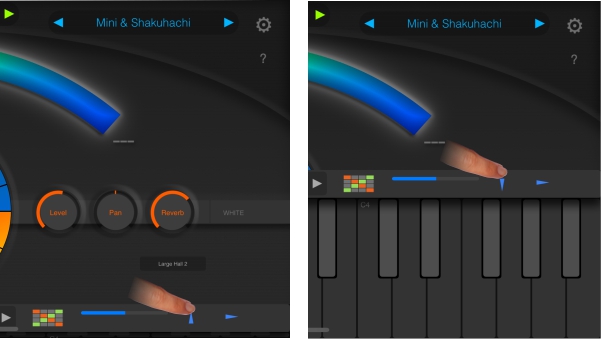
All sounds are edited very carefully, nevertheless you may want to modify one or the other according to your personal taste. For this purpose some rotary controllers are available whose function are described in the following.
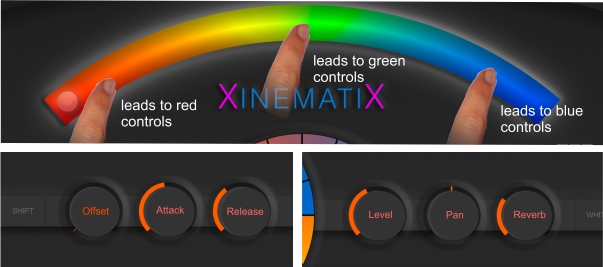 To modify the red sound, first tap in the red area of the multicolored arc.
This will display the rotary controllers in color red as illustrated here.
To modify the red sound, first tap in the red area of the multicolored arc.
This will display the rotary controllers in color red as illustrated here.
Tapping in the green area will call green colored rotary controllers
for modifying the green sound, tapping in the blue area will call
blue colored rotary controls for modifying the blue sound.
The rotary controllers have the following functions:
Offset: Controls the start point of a sound.
Attack: Controls the start phase of a sound. A small value keeps it distinct,
a high value makes it start smoother.
Release: Controls the fading out of a tone.
A small value keeps it short, a high value lets it fade out longer.
Level: Controls the volume of a sound.
Panning: Shifts the audible sound position to the right or left.
Reverb: Makes the reverb sound shorter or longer.
In addition, different room types can be selected for the reverb. See the following figure.
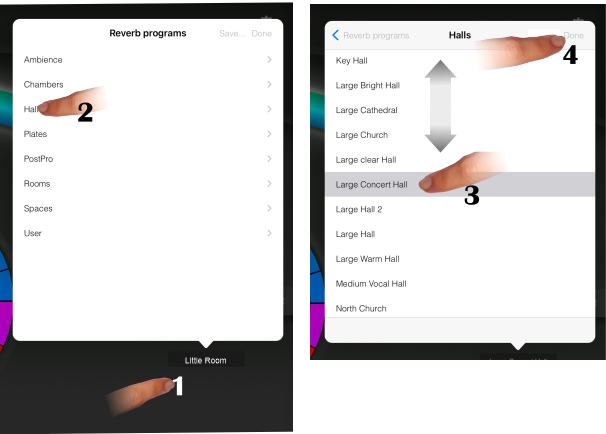 To select a new reverb type, first tap on the currently shown reverb name (1).
A directory of room types opens.
Tapping on one of these types (2) opens a list of the associated rooms.
Select the desired room (3) and tap on 'Done' (4).
To select a new reverb type, first tap on the currently shown reverb name (1).
A directory of room types opens.
Tapping on one of these types (2) opens a list of the associated rooms.
Select the desired room (3) and tap on 'Done' (4).
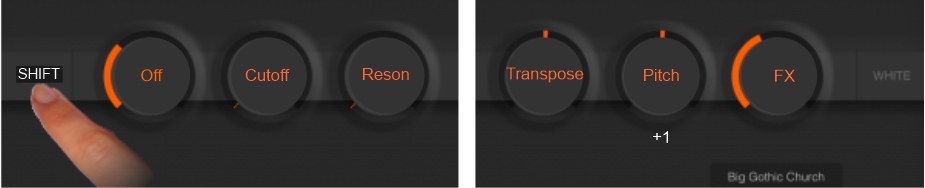 A tap on the 'Shift' button calls up more controllers.
Their functions are from left to right:
A tap on the 'Shift' button calls up more controllers.
Their functions are from left to right:
Off/db: Controls a low pass filter.
Cutoff: Determines where the signal is cut off.
Resonance: Boosts the frequencies of the cutoff frequencies.
Transpose: Retunes the selected sound in semitone steps.
We don't recommend this for a single red, green or blue sound, as a transpose function
should transpose all sounds equally. Use for this aim the white controller instead,
see what is described below by 'Modifying the sounds uniformly'.
Pitch: With the help of this control you can detune the sound. During the change of the pitch
a number below the controler shows the detune factor in white as Cent value.
(A tempered semitone comprises 100 Cent). Please handle this function carefully
as all XinematiX sounds already dynamically move the pitch up and down by about +/-2 cents.
A higher retuning value can cause negative effects.
FX: Effects.
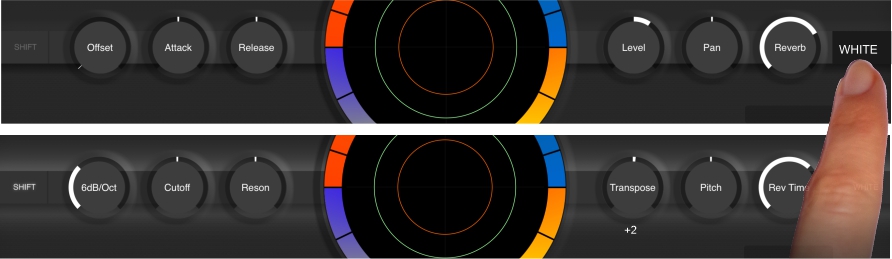 A tap on the WHITE text right of the controller circles turns them to color white.
This means that all controllers now access all called sounds (the red, the green and the blue one).
But caution! The white values are added to the previously edited individual values.
For the transpose function, the white controller is ideal. While editing Transpose, the retuning steps
are displayed as semitone values.
Quit the white controllers by tapping again on 'WHITE'.
A tap on the WHITE text right of the controller circles turns them to color white.
This means that all controllers now access all called sounds (the red, the green and the blue one).
But caution! The white values are added to the previously edited individual values.
For the transpose function, the white controller is ideal. While editing Transpose, the retuning steps
are displayed as semitone values.
Quit the white controllers by tapping again on 'WHITE'.
 If you want to assign other external controllers to certain elements, namely the slider
of the multi-colored arc or the six circular controllers, proceed as follows:
If you want to assign other external controllers to certain elements, namely the slider
of the multi-colored arc or the six circular controllers, proceed as follows:
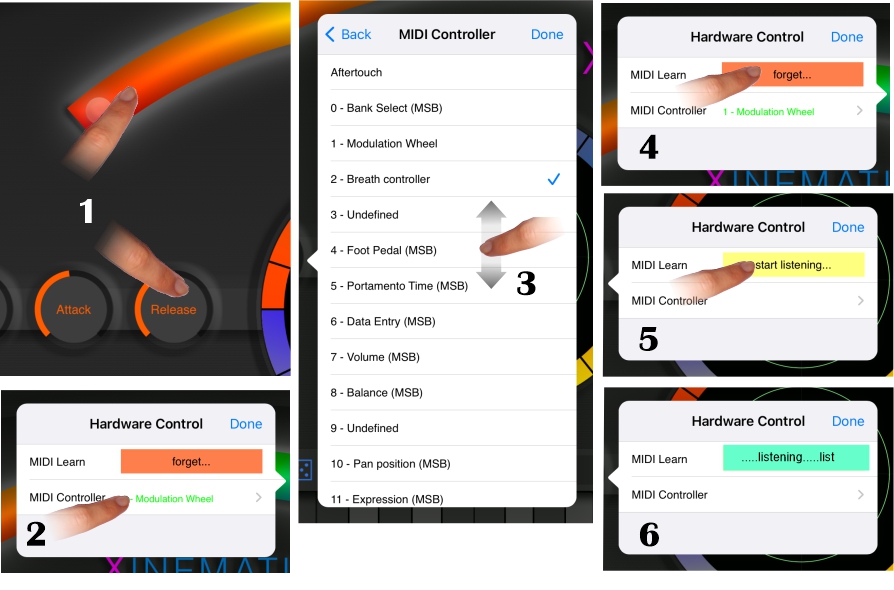
(1)Tap the desired item for several seconds.
(2) A pop-up window opens, showing the currently used controller.
Tap its name.
(3) A list with suggestions for a new controller opens. If the desired one is there,
select it by tapping on its name and then on 'Done'.
(4) If the desired item is not included in the list, tap 'forget' and then (5) 'start listening'.
(6) Now the listening starts. The first controller you move on your MIDI device will be taken over
as the new responsible controller.
Back to: Fundamental Settings
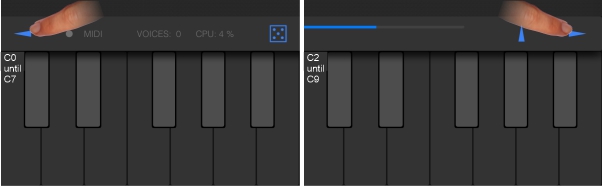
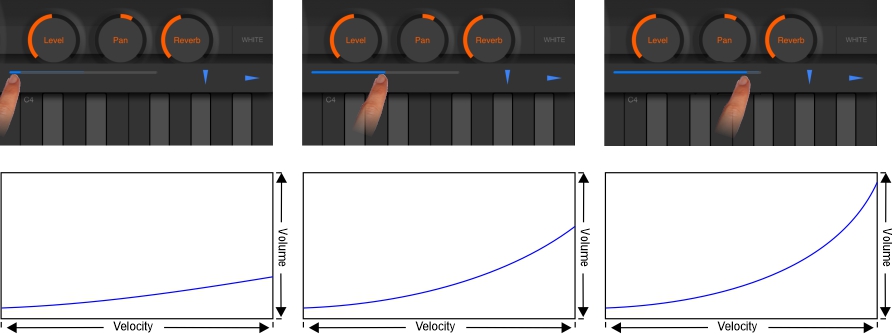 On the right above the virtual keys is a horizontal blue bar.
With this you can set the velocity response.
In the left short position, the volume changes only slightly in relation to the velocity.
In the middle position, the volume increases normally and
in the right long position, the volume changes very much to the velocity.
On the right above the virtual keys is a horizontal blue bar.
With this you can set the velocity response.
In the left short position, the volume changes only slightly in relation to the velocity.
In the middle position, the volume increases normally and
in the right long position, the volume changes very much to the velocity.
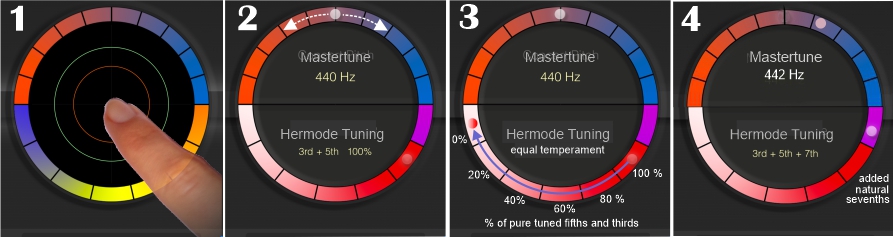 Tapping on the circle in the middle of user interface (image 1) opens an important and interesting tool.
Firstly you will find (image 2) a tool in the upper half of the circle that you are surely familiar with:
Modifying the general pitch by 'Mastertune'. The actual standard is a'= 440 Hz.
However, as it may happen that you have to play together with a higher or lower tuned instrument, you
have the possibility to adapt here. Moving the slider clockwise increases the general pitch, moving it
counterclockwise deepens it. The result obtained will be displayed as the frequency for the a'.
Tapping on the circle in the middle of user interface (image 1) opens an important and interesting tool.
Firstly you will find (image 2) a tool in the upper half of the circle that you are surely familiar with:
Modifying the general pitch by 'Mastertune'. The actual standard is a'= 440 Hz.
However, as it may happen that you have to play together with a higher or lower tuned instrument, you
have the possibility to adapt here. Moving the slider clockwise increases the general pitch, moving it
counterclockwise deepens it. The result obtained will be displayed as the frequency for the a'.
The tool in the lower half of the circle is much more interesting.
You should know that the prevailing tuning on classical keyboard instruments is not an ideal,
but a compromise in order to be able to make music in all keys.
Unfortunately, in these so-called equal- or near-equal-temperaments, the thirds are badly out of tune.
Therefore especially all major triads sound sharp and restless.
Against this, well educated musicians in ensembles with string and/or wind instruments as well as singers
in chamber choirs are trained to shadow the pitch of the performed tones upwards or downwards according their function
in the current harmonic environment. In this way they perform purely tuned thirds and fifths. In musicology this is
called 'just intonation'.
Hermode Tuning imitates this dynamic just intonation. In this way it produces a rich original sound in
all multivoiced music of string and wind instruments and of choirs.
Also music of pianos and pipe organs sounds clearer and more voluminous.
The images 3 and 4 show the different setting options of Hermode Tuning. Image 3 shows how to set the
tuning of fifhts ad thirds to just intonation. You can select the maximum of 100% and alternately reduced values
of 80, 60, 40 and 20% or 0%. The last value is the traditional equal temperament.
Image 4 shows how to control additionally to so-called 'natural sevenths', this means the sevenths
of dominant seventh chords (e.g. the F in G-B(H)-D-F). Played on their own, these chords sound very strong.
But since the natural seventh is tuned very low, it can lead to audible retuning in some musical situations,
for instance when playing legato A-C-F to G-B(H)-D-F.
The following settings of Hermode Tuning are recommended:
Orchestral sounds and those of harps, choirs, organs and pianos to '3rd + 5th = 80-100%'.
Pianos without other instruments alternately to 'natural sevenths'.
Synthesizer sounds to '3rd + 5th = 0%', according to equal temperament.
Mixes of orchestral, harps, piano and choirs in common with synthesizer sounds to '3rd + 5th' by a value between 40% and 80%.
In such a case test the best setting.
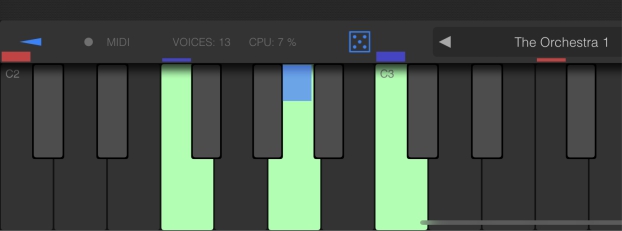 As soon as a Hermode Tuning mode is selected, the resulting pitch for each note is displayed as a bar
above the respective key of the on-scree keyboard. Sounding notes are represented by blue bars, silent notes by red bars.
As soon as a Hermode Tuning mode is selected, the resulting pitch for each note is displayed as a bar
above the respective key of the on-scree keyboard. Sounding notes are represented by blue bars, silent notes by red bars.
 Save modified Multis as follows:
Tap on the actual Multi name (1). A pop-up window opens in which all available Mltis are listed. Tap on 'Save' (2).
The pop up window changes its look.
If you want to keep the previous name, tap 'Save' (4) immediately, otherwise enter a new name (3) and then tap on 'Save' (4).
Now the old or the new edited Multi name will be displayed (5).
If you want to delete a Multi: Slide it over the left edge (6).
But if this Multi has already been placed in a Life Mode page (see section 'Life Mode pages' below),
the relevant button will still be visible there. But this button has no mor a function. As this button cannot
be deleted, it is advisable to edit a new button at this position, which is linked to an existing multi. See:
Edit the Life Mode pages
 At the bottom left is shown a cube symbol, representing a random generator.
A tap on this symbol will create a random Multi.
As the complete XinematiX library comprises approximately 1,000 sounds you could create
theoretically with this toy about 1,000,000,000 different Multis.
A nice toy, on the other hand a large part will not produce a convincing result.
At the bottom left is shown a cube symbol, representing a random generator.
A tap on this symbol will create a random Multi.
As the complete XinematiX library comprises approximately 1,000 sounds you could create
theoretically with this toy about 1,000,000,000 different Multis.
A nice toy, on the other hand a large part will not produce a convincing result.
Therefore it is much more productive to edit a Multi according to your personal taste.
The Life Mode pages form a tool that allows you to switch quickly from one Multi to another. This can be adventageous at musical performance.
 A tap on this symbol opens the Life Mode pages.
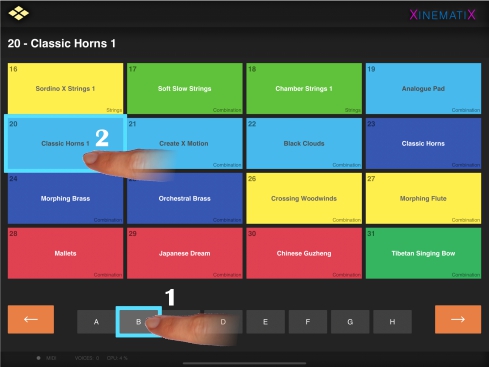
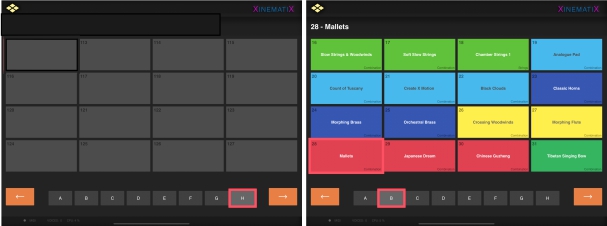 The Life Mode comprises 8 pages, each with space for 16 Multi entries. So there is room for a total of 128 Multis.
In default the 7 pages A-G are already filled in and open the relevant multi by pressing on them
The picture on the shows 2 pages of the Life Mode, the blank page H and the completely filled in page B.
In the latter, the sound 'mallets' is activated by tapping on it. Tapping next on the 'XinematiX' logo top on the right
opens this Multi.
The Life Mode comprises 8 pages, each with space for 16 Multi entries. So there is room for a total of 128 Multis.
In default the 7 pages A-G are already filled in and open the relevant multi by pressing on them
The picture on the shows 2 pages of the Life Mode, the blank page H and the completely filled in page B.
In the latter, the sound 'mallets' is activated by tapping on it. Tapping next on the 'XinematiX' logo top on the right
opens this Multi.
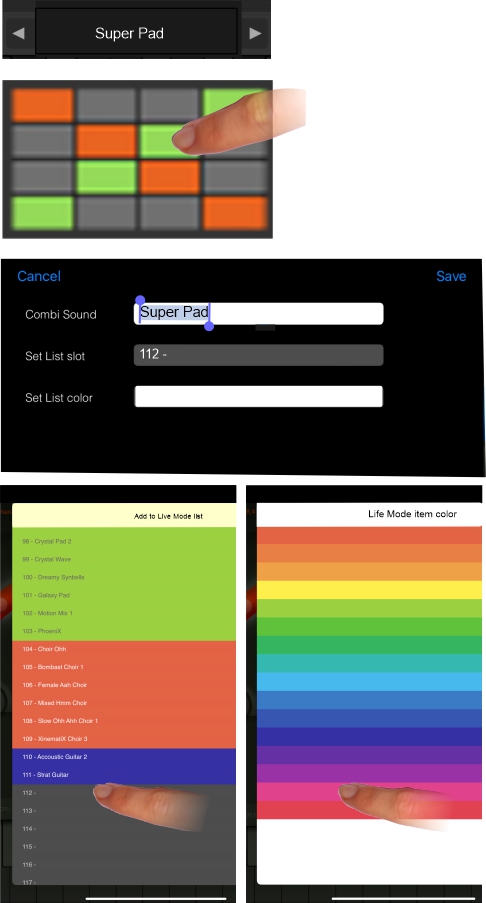 To add a Multi to the Life Mode, select it in the list of Multis so that its name is entered at the bottom centre.
Now press the Life Mode symbol for some seconds, until a pop-up window opens.
In this window you will find the name of the selected Multi already entered in the first line.
Tapping on the second line opens a list contenting the 128 fields of the Life Mode.
The already occupied fields are shown in color, the unoccupied ones appear in grey.
In this example you select the actual unoccupied 112 field by tapping on it.
Tapping on the third line opens a color palette in which you tap on the desired color
of the new entry. In this case you select a purple red.
The selected color is not shown in this pop up window, but it will be adopted on the Life Mode page.
Confirm by tapping on 'Save'.
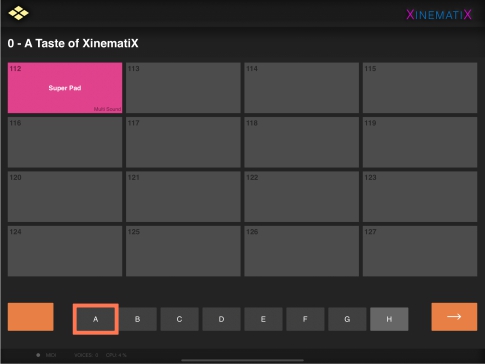 Now you will find your Multi entered in the Life Mode page.
A hint
If you select for the new added Multi a storage location whis is already occupied, this previous entry will be
overwritten.
However, this Multi will not be deleted, it is still contained in the directory of Multis and can be opene
as described here.
Tap on the provided field for about two seconds and then remove your finger. The Life Mode color palette opens. Select the desired color by tapping on it.
 Close the Life Mode pages by tapping on the 'XinematiX' logo right on the top.
There exist three ways to do this, as described below.
 Tap the name of the currently called Multi at the bottom centre.(1).
A list of all actual edited Multis opens. Scroll up and down this list until you find the desired Multi (2).
Tap on the desired Multi for opening it (3). Close the list by tapping on "Done" (4).
Tap the name of the currently called Multi at the bottom centre.(1).
A list of all actual edited Multis opens. Scroll up and down this list until you find the desired Multi (2).
Tap on the desired Multi for opening it (3). Close the list by tapping on "Done" (4).
 Tap on the Life Mode page icon. The Life Mode pages open. Select the relevant page using the letters A to H (1)
and then the desired Multi within this page (2).
Then tap on the Xinematix logo at the top right to return to the main page.
Tap on the Life Mode page icon. The Life Mode pages open. Select the relevant page using the letters A to H (1)
and then the desired Multi within this page (2).
Then tap on the Xinematix logo at the top right to return to the main page.
You can call up a Multi as usual by a program change command from your keyboard or other MIDI device. The program number corresponds to that in the Life Mode list.
Please note:
The setting of the Layer or the Crossfade Mode is not stored in the Multis and therefore remain in
the position of the last Multi played. Correct this setting if necessary by
tapping on the one-line or the three-line symbol.
Back to: Edit a new Multi
![]() This pop up window presents some useful tools and MIDI settings.
This pop up window presents some useful tools and MIDI settings.
MIDI Input: Is set in default to 'OMNI' (all) MIDI Channels.
If you want to control XinematiX for certain reasons via one of the MIDI channels 1 - 16 ,
tap on the little arrow on the right in the “Midi Input” line. A pop up windows opens,
presenting different Midi channel settings.
Select the intended MIDI channel and confirm with 'Done'
Background audio: Is by default set to "Off". Setting it to "On" allows you to take
background audio from other apps.
Write app store review: We would appreciate positive reviews. However, if you make critical comments,
we will take them as an opportunity for improvement.
Bluetooth MIDI: Shows your Bluetooth MIDI Devices if present.
MIDI Sources: Is set by default to 'Network Session 1' and supports all incoming MIDI messages
of all MIDI Devices.
MPE Pitchbend: Is set in default to '48'.
We recommend maintaining this value.
MIDI Program change: This is set by default to 'On' and thus supports program changes of your MIDI device.
Keyboard velocity: Is set by default to 'On' and thus supports the velocity messages of your MIDI device.
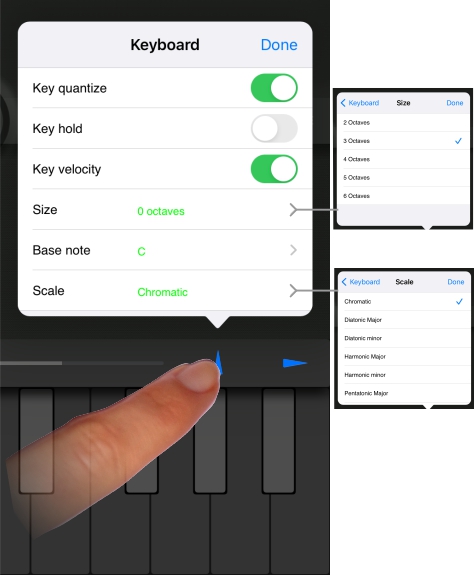 This pop up window can be opened by pressing the blue arrow pointing upwards.
Here the following settings can be made:
This pop up window can be opened by pressing the blue arrow pointing upwards.
Here the following settings can be made:
Key quantize:
These setting affects only the virtual keyboard. In default it is set to "On".
If you set it to "Off" and you swipe the keys horizontally, the tones glide into each other.
Key hold: Is set in default to "Off". If you set it to "ON", a struck note will sound until
you strike the relevant key again.
Key velocity: Is set in default to "On" and thus supports the incoming velocity messages by
different loudnesses. Setting it to "Off" will perform all notes with one and the same loudness.
Size: Shows the number of displayed octaves of the virtual keyboard. The default is 3 octaves,
by setting the hook to another number, this will be immediately changed.
Scale: Is set in default to "Chromatic" with all 12 keys of the octave activated.
By switching to a different scale, only a reduced selection of notes necessary for this scale will sound.
For example: With a "Pentatonic Major" Scale you can improvise without much thought historical
monophonic Chinese or Japanese five tone music. A bit more sophisticated is "Blues Major", for example.
With "Base note" set the basic note for the reduced scale.
Please don't forget a reset to "Chromatic" at the end of your experiments with reduced scales.
Back to: Launching the App
With the Osmose synth it is possible to mix or blend the actively sounds of XinematiX individually for each note played.
Prepare Osmose as follows:
Set the MIDI mode in "config menu" to "mpe preset".
Connect Osmose with XinematiX.
 Prepare XinematiX with the following steps:
1. Tap on the Settings icon in the upper right corner.
2. A pop up window opens. Tap on 'MIDI input'.
3. In the new opened pop up window tap on 'MPE Master 1'. Then tap on 'MIDI Sources'. If you find two
entries of 'Osmosis port 1', remove one of them because otherwise every note will be played twice.
4. Switch to the rainbow image and tap on it for a few seconds. A new pop up window 'Hardware Control' opens.
5. Tap on 'MIDI Controller'.
6. In the new pop-up window scroll down to the entry '74 - MPE Timbre (Bright)'. Tap on it and close with 'Done'.
That's it. Now you should be able to control and variate the blending of the sounds of the actual opened Multi
by different pressing for each note.
Back to: Edit a new Multi
To obtain a selection of sample libraries that requires less memory and meets your requirements, proceed as follows:
Download a first quantity of about 20 sample libraries.Then open each library and listen to its sounds. Then decide which
ones you want to keep. Uninstall the others. Make your selection for the remaining about 40 libraries in the same way.
We know that all of this is a bit cumbersome. But you will be rewarded with a beautiful selection that meets your wishes.
Back to:
Complete the XinematiX sample libraries
Firstly connect a suitable SSD with your iPad or iPhone. Please note that this SSD must have a performance of at least 1000 MB/sec.

Tap on the tool symbol to open the Settings (1). Scroll down until the entry "Storage place" appears and tap on
"local" (2).
A new pop up window opens. Tap on "select external storage (3).
A new pop up window opens and shows on the left the name of your connected device. Tap on its name (4).
A new pop up window opens and displays the currently saved content of your external device. Add a new folder by tapping on
the folder icon at the top (5).
Give this new folder a new name, for instance: "X" (6).
Finally tap on "open" (7)
The new pop up window shows that an external storage place is selected (8)
Back to:
Complete the XinematiX sample libraries